Creating and assigning profiles
This guide shows you how to create and apply profiles to ensure consistent configuration across multiple nodes in Infrahub. Profiles help you maintain standardized configurations and reduce repetitive work when managing similar objects.
What you'll achieve
By following this guide, you'll:
- Create a profile that defines standard configuration for network interfaces
- Apply the profile to multiple interfaces to ensure consistency
- Learn how to override profile values for specific interfaces
- Understand how profile inheritance works in Infrahub
Prerequisites
- Infrahub instance running and accessible
- Schema loaded with nodes that support profiles
- Basic understanding of GraphQL mutations and queries
Load the schema
This step is only necessary if you don't already have a schema with profile-enabled nodes in your instance.
- Create a
schema.ymlfile in the schemas directory of your repository:
# yaml-language-server: $schema=https://schema.infrahub.app/infrahub/schema/latest.json
---
version: "1.0"
nodes:
  - name: Interface
    namespace: Infra
    description: "Network Interface"
    label: "Interface"
    generate_profile: true # Enable profile generation (default)
    include_in_menu: true
    icon: "mdi:ethernet"
    display_labels:
      - name__value
    order_by:
      - name__value
    attributes:
      - name: name
        kind: Text
        optional: false
        unique: true
      - name: description
        kind: Text
        optional: true
      - name: speed
        kind: Number
        optional: true
      - name: auto_negotiation
        kind: Boolean
        default_value: false
      - name: mtu
        label: MTU
        kind: Number
        default_value: 1500
      - name: enabled
        kind: Boolean
        default_value: false
      - name: mode
        kind: Dropdown
        default_value: access
        choices:
          - name: access
            label: Access
          - name: trunk
            label: Trunk
      - name: status
        kind: Dropdown
        optional: true
        choices:
          - name: active
            label: Active
            description: "Fully operational and currently in service"
            color: "#7fbf7f"
          - name: provisioning
            label: Provisioning
            description: "In the process of being set up and configured"
            color: "#ffff7f"
          - name: maintenance
            label: Maintenance
            description: "Undergoing routine maintenance or repairs"
            color: "#ffd27f"
          - name: drained
            label: Drained
            description: "Temporarily taken out of service"
            color: "#bfbfbf"
      - name: role
        kind: Dropdown
        optional: true
        choices:
          - name: uplink
            label: Uplink
            description: "Interface connected to other network device"
            color: "#9090de"
          - name: end_user
            label: End user
            description: "Interface to connect end-user devices"
            color: "#ffa07a"
          - name: server
            label: Server
            description: "Interfaces to connect to servers"
            color: "#98b2d1"
- Load the schema with this command:
infrahubctl schema load schema.yml
You should see: schema 'schema.yml' loaded successfully
Step 1: Creating a profile
Create an interface profile
Let's create a profile that defines the standard configuration for end-user interfaces. This profile will set common attributes that should be applied consistently across multiple interfaces.
The profile will define these standard settings:
- Speed: 1000 Mbps
- Status: active (interface is operational)
- Enabled: true (interface is administratively up)
- Auto negotiation: enabled
- MTU: 1500 bytes
- Mode: access (not trunk)
- Role: end_user
- Web interface
- GraphQL
- Open the Infrahub UI in your browser
- Navigate to Object Management → Profiles
- Click on Add Profile
- Select InfraInterface as the profile type
- Fill in the profile details as follows:
- Profile Name: end-user-interface
- Speed: 1000
- Auto Negotiation: true
- MTU: 1500
- Enabled: true
- Mode: access
- Status: active
- Role: end_user
- Click Save to create the profile
Access the GraphQL sandbox by clicking your user icon in the bottom left corner and selecting GraphQL Sandbox.
mutation {
  ProfileInfraInterfaceCreate(
    data: {
      profile_name: {value: "end-user-interface"}
      status: {value: "active"}
      enabled: {value: true}
      speed: {value: 1000}
      auto_negotiation: {value: true}
      mtu: {value: 1500}
      mode: {value: "access"}
      role: {value: "end_user"}
    }
  ) {
    ok
    object {
      id
      profile_name {
        value
      }
    }
  }
}
Verify the profile was created
Query Infrahub to confirm the profile exists:
- Web interface
- GraphQL
- Navigate to Object Management → Profiles
- Locate the end-user-interface profile in the list and click on it
query {
  ProfileInfraInterface(profile_name__value: "end-user-interface") {
    edges {
      node {
        id
        profile_name {
          value
        }
        status {
          value
        }
        enabled {
          value
        }
        mtu {
          value
        }
      }
    }
  }
}
You should see the profile with all attributes set to your specified values.
Step 2: Using the profile
Create interfaces using the profile
Now that we have a profile, let's create multiple interfaces that inherit configuration from it. When using profiles, you only need to specify the unique attributes (like name) and reference the profile for all standardized values.
- Web interface
- GraphQL
- Navigate to Interface
- Click on Add Interface
- Fill in the interface details as follows:
- Profile: end-user-interface
- Interface Name: GigabitEthernet0/0/0
You should see interface field values automatically populated when selecting the profile.
- Click Save to create the interface
- Repeat the process for additional interfaces:
- Profile: end-user-interface
- Interface Name: GigabitEthernet0/0/1 and GigabitEthernet0/0/2
mutation {
  int0: InfraInterfaceCreate(
    data: {
      name: {value: "GigabitEthernet0/0/0"},
      profiles: [{hfid: ["end-user-interface"]}]
    }
  ) {
    ok
    object {
      id
    }
  }
  int1: InfraInterfaceCreate(
    data: {
      name: {value: "GigabitEthernet0/0/1"},
      profiles: [{hfid: ["end-user-interface"]}]
    }
  ) {
    ok
    object {
      id
    }
  }
  int2: InfraInterfaceCreate(
    data: {
      name: {value: "GigabitEthernet0/0/2"},
      profiles: [{hfid: ["end-user-interface"]}]
    }
  ) {
    ok
    object {
      id
    }
  }
}
The query should return the IDs of the created interfaces:
{
  "data": {
    "int0": {
      "ok": true,
      "object": {
        "id": "185cd024-5c9a-2afb-3583-c513b8097987"
      }
    },
    "int1": {
      "ok": true,
      "object": {
        "id": "185cd024-70f4-7fdf-3585-c51087cce195"
      }
    },
    "int2": {
      "ok": true,
      "object": {
        "id": "185cd024-777e-bcb1-358e-c5170daba901"
      }
    }
  }
}
Verify profile inheritance
Now let's verify that the interfaces have properly inherited values from the profile. Infrahub's metadata shows which values came from profiles, giving you complete transparency about data origin.
- Web interface
- GraphQL
- Navigate to Interface
- Click on GigabitEthernet0/0/0 to view the details
- Click the "info" icon next to MTU to see the metadata
You should see that the MTU value is inherited from the profile.

query {
  InfraInterface(name__value: "GigabitEthernet0/0/0") {
    edges {
      node {
        name {
          value
          is_from_profile
        }
        mtu {
          value
          is_from_profile
          source {
            hfid
            display_label
          }
        }
      }
    }
  }
}
You should see that the MTU value is inherited from the profile.
{
  "data": {
    "InfraInterface": {
      "edges": [
        {
          "node": {
            "name": {
              "value": "GigabitEthernet0/0/0",
              "is_from_profile": false
            },
            "mtu": {
              "value": 1500,
              "is_from_profile": true,
              "source": {
                "hfid": [
                  "end-user-interface"
                ],
                "display_label": "end-user-interface"
              }
            }
          }
        }
      ]
    }
  }
}
Step 3: Override profile values
While profiles ensure consistency, you sometimes need exceptions for specific devices or interfaces. Infrahub lets you override profile values when needed.
Create an interface with custom MTU
Create an interface with a custom MTU value that overrides the profile default:
- Web interface
- GraphQL
- Navigate to Interface
- Click on Add Interface
- Fill in the interface details as follows:
- Profile: end-user-interface
- Interface Name: GigabitEthernet0/0/3
- MTU: 9000 (this overrides the MTU value)
- Click Save to create the interface
mutation {
  InfraInterfaceCreate(
    data: {
      name: {value: "GigabitEthernet0/0/3"},
      mtu: {value: 9000},  # Override profile MTU
      profiles: [{hfid: ["end-user-interface"]}]
    }
  ) {
    ok
    object {
      id
    }
  }
}
Verify the override
Confirm that the MTU was overridden while other values still come from the profile:
- Web interface
- GraphQL
- Navigate to Interface
- Click on GigabitEthernet0/0/3 to view the details
- Click the "info" icon next to MTU to see the metadata
You should see that the MTU value is not inherited from the profile (source is empty).
query {
  InfraInterface(name__value: "GigabitEthernet0/0/3") {
    edges {
      node {
        mtu {
          value
          is_from_profile
        }
      }
    }
  }
}
You should see that the MTU value is not inherited from the profile.
{
  "data": {
    "InfraInterface": {
      "edges": [
        {
          "node": {
            "mtu": {
              "value": 9000,
              "is_from_profile": false
            }
          }
        }
      ]
    }
  }
}
Step 4: Updating a profile
One of the key benefits of profiles is that when you update a profile, all nodes using it automatically inherit the changes. This provides a powerful way to update configurations across your infrastructure.
Updating the profile
We will change the end-user-interface profile to set a new default MTU of 9000 instead of 1500.
- Web interface
- GraphQL
- Open the Infrahub UI in your browser
- Navigate to Object Management → Profiles
- Locate the end-user-interface profile in the list and click on it
- Click Edit Profile Interface
- Change the MTU value to
9000 - Click Save to apply the changes
mutation {
  ProfileInfraInterfaceUpdate(
    data: {
      hfid: ["end-user-interface"]
      mtu: {value: 9000} # Change the profile's MTU
    }
  ) {
    ok
  }
}
Verify the update in interfaces
- Web interface
- GraphQL
- Navigate to Interface
query {
  InfraInterface {
    edges {
      node {
        display_label
        mtu {
          value
          is_from_profile
        }
      }
    }
  }
}
You should see that the MTU value is now 9000 for all the interfaces.
Conclusion
You've successfully set up profiles for your interfaces in Infrahub. Here's what you've accomplished:
- Created a standardized profile for end-user interfaces
- Applied the profile to multiple interfaces to ensure consistent configuration
- Verified how values are inherited from profiles using metadata
- Overridden specific profile values for individual interfaces when needed
- Updated a profile and observed changes propagate automatically
- Worked with multiple profiles and understood inheritance priority
Advanced usage
Using multiple profiles
Infrahub lets you assign multiple profiles to a single node, giving you powerful composition capabilities. When multiple profiles define the same attribute, the profile_priority value controls which takes precedence (lower number = higher priority).
Learn more about profile priorities in the Understanding profiles in Infrahub topic.
Step 1: Creating another profile
- Web interface
- GraphQL
- Navigate to Object Management → Profiles
- Click on Add Profile
- Select InfraInterface as the profile type
- Fill in the profile details as follows:
- Profile Name: high-speed-interface
- MTU: 9000
- Speed: 10000
- Click Save to create the profile
mutation {
  ProfileInfraInterfaceCreate(
    data: {
      profile_name: {value: "high-speed-interface"}
      profile_priority: {value: 500} # Lower number = higher priority
      speed: {value: 10000}
      mtu: {value: 9000}
    }
  ) {
    ok
  }
}
Step 2: Assigning multiple profiles to an interface
- Web interface
- GraphQL
- Navigate to Interface
- Click on Add Interface
- Fill in the interface details as follows:
- Profile:
end-user-interfaceandhigh-speed-interface - Interface Name: GigabitEthernet0/0/4
- Profile:
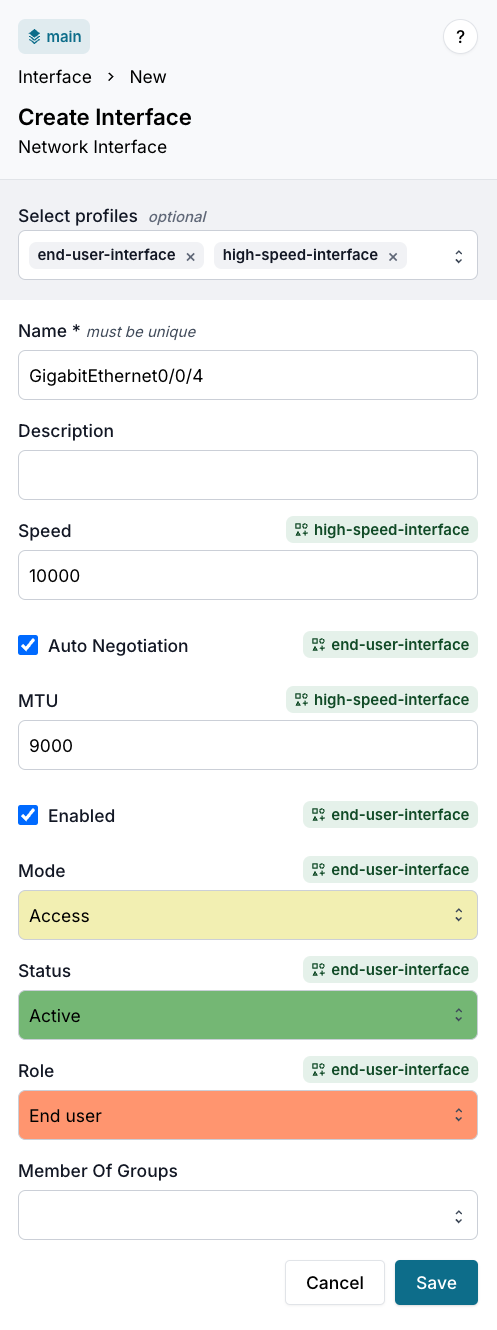
You should see interface field values automatically populated when selecting the profiles.
- Click Save to create the interface
mutation {
  InfraInterfaceCreate(
    data: {
      name: {value: "GigabitEthernet0/0/4"},
      profiles: [{hfid: ["end-user-interface"]}, {hfid: ["high-speed-interface"]}]
    }
  ) {
    ok
    object {
      id
    }
  }
}
Step 3: Validating profile inheritance with multiple profiles
Let's check which profile values are being applied when multiple profiles define the same attribute:
- Web interface
- GraphQL
- Navigate to Interface
- Click on GigabitEthernet0/0/4 to view the details
- Click the "info" icon next to Speed to see the metadata
- Click the "info" icon next to Status to see the metadata
query {
  InfraInterface(name__value: "GigabitEthernet0/0/4") {
    edges {
      node {
        name {
          value
        }
        status {
          value
          is_from_profile
          source {
            hfid
            display_label
          }
        }
        speed {
          value
          is_from_profile
          source {
            hfid
            display_label
          }
        }
      }
    }
  }
}
{
  "data": {
    "InfraInterface": {
      "edges": [
        {
          "node": {
            "name": {
              "value": "GigabitEthernet0/0/4"
            },
            "status": {
              "value": "active",
              "is_from_profile": true,
              "source": {
                "hfid": [
                  "end-user-interface"
                ],
                "display_label": "end-user-interface"
              }
            },
            "speed": {
              "value": 10000,
              "is_from_profile": true,
              "source": {
                "hfid": [
                  "high-speed-interface"
                ],
                "display_label": "high-speed-interface"
              }
            }
          }
        }
      ]
    }
  }
}
You should see that:
- The Speed value (10000) is inherited from the
high-speed-interfaceprofile - The Status value (active) is inherited from the
end-user-interfaceprofile
Related resources
- Understanding profiles in Infrahub - Detailed explanation of profile concepts, inheritance rules, and design decisions
- Metadata - Learn how Infrahub tracks data lineage and attribute sources
- Creating a schema - Learn to create schemas that generate profile support
- Node schema reference - Complete reference for node configuration including the
generate_profileoption - Schema validation - Validate your schemas before loading
- GraphQL API - Overview of Infrahub's GraphQL API
- Python SDK documentation - Full SDK reference for programmatic profile operations